ServerEngine – Configure WinRM
Configure WinRM without encryption (Port 5985): #
WinRM Quick config: #
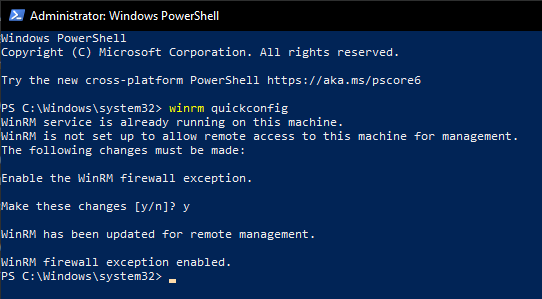
Open a PowerShell as Administrator on target server and run:
winrm quickconfig
Accept the firewall configuration with “y” which opens port 5985 for communication:

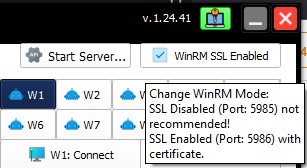
Uncheck to “WinRM SSL Disabled” and you should be ready to go:

Configure WinRM SSL (Port 5986) #
To configure WinRM SSL on multiple servers with one script i provide some scripts to make this process a little bit easier.
WinRM SSL ensures a encrypted connection between ServerEngine and the target hosts which we highly recommend!
Important note: To successfully connect to the target server the DNS-Name and Domain must match exactly in all configurations.
For Example: TEST-Host1.domain.com
- Using another DNS Alias is not supported!
- Using the IP-Address is not supported!
- The DNS-Name used must match the DNS-Name seen in Server-Manager->Local Server->Computer name
- The Domain used must match the Domain seen in Server-Manager->Local Server->Domain
- The Domain must match the Domain in the Certificate
- The Domain must match the Domain in the WinRM configuration
- Thumbprint in WinRM configuration must match Thumbprint of imported Certificate
What you need:
- PFX Certificate and Password (Which is the certificate and key in one file)
- Create a certificate wildcart (*.domain.com)
- Convert certificate and key to PFX and set a password
- PFX HEX representation of your PFX certificate
- Use provided script
- Thumbprint of PFX certificate
- Use provided script
- Configure WinRM SSL on multiple servers with the same script
- Use provided script
Don’t hesitate to contact us we can provide you with a certificate is no time 🙂
Go to: https://cforce-it.com/support/ and request your certificate for your company.
Just mention your FQDN domain like: “*.cforce-it.network” if you are not sure run:
systeminfo | findstr /B /C:"Domain"

Script 1: PFX Hex and Thumbprint #
This script will create:
- Text file “pfx_hex.txt“
- Text file “pfx_thumbprint.txt“
Make sure to replace:
- Your own PFX file path
- Your PFX file password
- Your destination path for the txt files
# -----------------------------------------------------------
# copyright CForce-IT, Claudio Orlando
# -----------------------------------------------------------
#
# Read the binary content of the .pfx file
$pfxFile = "S:\winRM_CForce-IT.network.pfx"
$pfxPassword = "myPFXPassword"

$pfxBytes = [System.IO.File]::ReadAllBytes($pfxFile)

# Convert binary data to hexadecimal string
$pfxHex = [System.BitConverter]::ToString($pfxBytes) -replace '-'

# Write the hex to text file
$pfxHex | Out-File -FilePath "S:\pfx_hex.txt"

# Read and write the thumbprint to text file
$cert = New-Object System.Security.Cryptography.X509Certificates.X509Certificate2
$cert.Import($pfxFile, $pfxPassword, [System.Security.Cryptography.X509Certificates.X509KeyStorageFlags]::DefaultKeySet)
$thumbprint = $cert.Thumbprint
$thumbprint | Out-File -FilePath "S:\pfx_thumbprint.txt"
Now we are set to prepare the next script to configure multiple servers with WinRM SSL:
- Replace HEX content in: $pfxHex = “myhexcontent“
- Replace Password in: $pfxPassword = “mypassword“
- Replace your own Domain after wildcart dot “*.” in:
$listener = ‘@{Hostname=”*.yourdomain.com“;CertificateThumbprint=”yourpfxthumbprint”}’ - Replace Thumbprint content in:
$listener = ‘@{Hostname=”*.CForce-IT.network”;CertificateThumbprint=”yourpfxthumbprint“}’
Script 2: Configure WinRM SSL on multiple servers #
This script will create the PFX file from the HEX content in TEMP and import the PFX certificate to the correct location and configure WinRM SSL
# -----------------------------------------------------------
# copyright CForce-IT, Claudio Orlando
# -----------------------------------------------------------
#
# replace with your own data
$pfxHex = "myhexcontent"
$pfxPassword = "mypassword"

# Convert hexadecimal string back to binary data
$pfxHex = $pfxHex -replace '\s', '' -replace '[^0-9a-fA-F]', ''

# Convert hexadecimal string to binary data
$pfxBytes = [byte[]]::new($pfxHex.Length / 2)
for ($i = 0; $i -lt $pfxHex.Length; $i += 2) {
    $pfxBytes[$i / 2] = [Convert]::ToByte($pfxHex.Substring($i, 2), 16)
}

# Write the binary data to a .pfx file
[System.IO.File]::WriteAllBytes("$env:TEMP\WinRM.pfx", $pfxBytes)

# Save the certificate string to a temporary PFX file
$certificateFile = "$env:TEMP\WinRM.pfx"

# Import the PFX certificate
certutil -f -p $pfxPassword -importpfx $certificateFile noroot

# Enable WinRM SSL
$listener = '@{Hostname="*.CForce-IT.network";CertificateThumbprint="yourpfxthumbprint"}'
winrm create winrm/config/Listener?Address=*+Transport=HTTPS $listener

# Check WinRM Config
winrm e winrm/config/Listener
# Configure Firewall
netsh advfirewall firewall add rule name="WinRM SSL (HTTPS-In)" dir=in action=allow protocol=TCP localport=5986
# WinRM SSL option can now be Enabled
Check “WinRM SSL Enabled” and you should be ready to go:

(*optional) Remove WinRM HTTP configuration:
winrm delete "winrm/config/Listener?Address=*+Transport=HTTP"
(*optional) Remove WinRM SSL HTTPS configuration:
winrm delete "winrm/config/Listener?Address=*+Transport=HTTPS"